Faceted Search Guide
(Using jQuery)
Faceted search is a method of browsing data. They apply filters to items within a collection.
With wide adoption as a standard search UI element, facets are an expected feature in any e-commerce store.
We will build a simple, read-only e-commerce product browsing page.
The tutorial uses:
The finished example can be found on GitHub.
Prerequisites
Before continuing, we'll examine our sample data.
If you are not familiar with the basics of the Swiftype API, please visit our API overview page.
In this example, product is the name of our DocumentType and it contains 50 documents.
The schema for each product looks like this:
product
{:name => 'title', :type => 'string', :value => ... },
{:name => 'description', :type => 'text', :value => ... },
{:name => 'quantity', :type => 'integer', :value => ... },
{:name => 'category', :type => 'enum', :value => ... },
{:name => 'price', :type => 'float', :value => ... },
{:name => 'tags', :type => 'enum', :value => ... },
{:name => 'published_on', :type => 'date', :value => ... },
{:name => 'url', :type => 'enum', :value => ... }
Learn more about Site Search Engine schemas within our schema design guide.
Now, we can start building our example application.
Step 1: Create base HTML markup
Before we get to adding faceted search, we need to create a simple page, that does two things:
- Reference all of the necessary JavaScript libraries.
- Provide basic markup to serve as a foundation for the future steps in this tutorial.
Save the following files in a new folder...
From the Search jQuery plugin:
jquery.swiftype.search.jssearch.css
From the Autocomplete jQuery plugin:
autocomplete.cssjquery.swiftype.autocomplete.js
Next, in the same folder, we will create two files named index.html and custom.css.
After that, we should make some changes to the index.html file:
<!DOCTYPE html>

<html>
  <head>
    <title>Swiftype Faceted Search E-Commerce Store Example</title>
    <script src="https://ajax.googleapis.com/ajax/libs/jquery/3.4.1/jquery.min.js"></script>
    <script type="text/javascript" src="https://cdnjs.cloudflare.com/ajax/libs/hogan.js/3.0.2/hogan.min.js"></script>
    <script type="text/javascript" src="jquery.swiftype.autocomplete.js"></script>
    <script type="text/javascript" src="jquery.swiftype.search.js"></script>
    <link type="text/css" rel="stylesheet" href="autocomplete.css" media="all" />
    <link type="text/css" rel="stylesheet" href="search.css" media="all" />
    <link type="text/css" rel="stylesheet" href="custom.css" media="all" />
  </head>
  <body>
    <div class="container">

    <h1>Swiftype Faceted Search E-Commerce Store Example</h1>
    <form>
      <label>Search products</label>
      <input type='text' id='st-search-input' class='st-search-input'
        placeholder="Search by typing (ex. 'product') and pressing enter"
        aria-label="Search by typing (ex. 'product') and pressing enter"
      />
    </form>
    <div id="menu">
      <h3>Sorted by</h3>
      <a href="#" class="sort active" ><label>Relevance</label></a>
      <a href="#" class="sort" data-field="price" data-direction="asc"><label>Price</label></a>
      <a href="#" class="sort" data-field="published_on" data-direction="desc"><label>Date Added</label></a>

      <div id="facets">
        <div class="st-custom-facets">
          <h3>Prices</h3>
          <input type="checkbox" class="price-filter" name="price" data-type="range" data-from="0" data-to="5" id="under5">
          <label for="under5">Under $5</label><br />
          <input type="checkbox" class="price-filter" classname="price" data-type="range" data-from="0" data-to="10" id="under10">
          <label for="under10">Under $10</label><br />
          <input type="checkbox" class="price-filter" classname="price" data-type="range" data-from="0" data-to="25" id="under25">
          <label for="under25">Under $25</label><br />
          <input type="checkbox" class="price-filter" classname="price" data-type="range" data-from="50" data-to="*" id="over50">
          <label for="over50">Over $50</label>
        </div>
        <div class="st-dynamic-facets">
        </div>
      </div>
    </div>

    <div id="results">
      <div id="st-results-container">
        <span id="no-results">No products found</span>
      </div>
    </div>

    </div>

    <script type="text/javascript">
    </script>
  </body>
</html>
As you may have noticed, we are using Hogan.js as a JavaScript templating engine.
For custom.css, you can either style it yourself or grab our example stylesheet.
Now, open index.html in your browser.
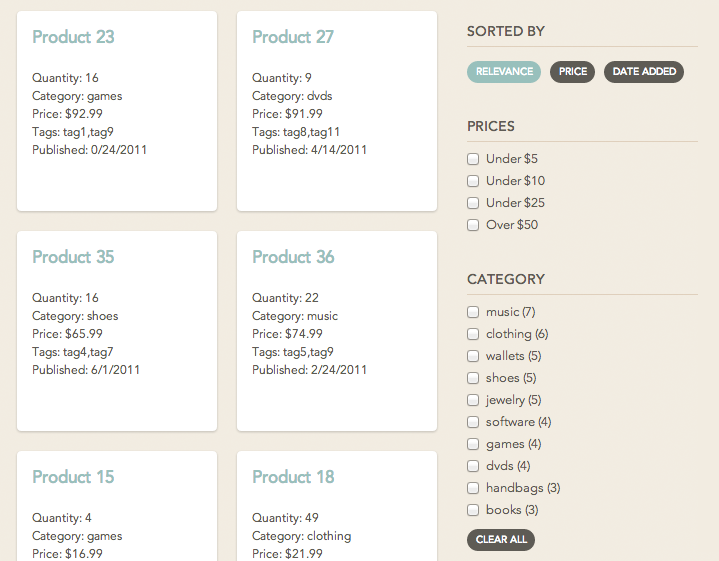
You should see header text and a search box on the left-hand side of the page.
On the right-hand side, you should see a panel with a few filters.
Keep in mind that we have not yet wired up any functionality!
Step 2: Enable both jQuery Plugins
Now we will add working search with autocomplete functionality to our page.
First, let's add autocomplete functionality.
Inside of our <script> tag, initialize the Autocomplete jQuery plugin.
$('#st-search-input').swiftype({
  engineKey: 't2s8T3sUKx4jJoebs73L'
});
Try typing "product" into the search box -- we have autocomplete results!
Next, we'll initialize the Search jQuery plugin. As a heads up, we'll continue to modify the settings we're passing into swiftypeSearch's options throughout the tutorial, so you'll want to have this at the bottom of your <script> tag.
$('#st-search-input').swiftypeSearch({
  resultContainingElement: '#st-results-container',
  perPage: 12,
  engineKey: 't2s8T3sUKx4jJoebs73L',
});
Now, let's set up custom rendering for our search results. Place this code at the top of your <script> tag.
var resultTemplate = Hogan.compile([
  "<div class='product'>",
    "<h2>Faceted Search Guide</h2>",
    "<div>Quantity: </div>",
    "<div>Category: </div>",
    "<div>Price: $</div>",
    "<div>Tags: </div>",
    "<div>Published: </div>",
  "</div>"
].join('') );

var customRenderFunction = function(document_type, item) {
  var date = new Date(item['published_on']),
  data = {
    title: item['title'],
    quantity: item['quantity'],
    price: item['price'],
    category: item['category'],
    tags: item['tags'],
    published_on: [date.getMonth(), date.getDate(), date.getFullYear()].join('/')
  };
  return resultTemplate.render(data);
};
In this snippet, renderFunction takes a function that customizes the way results are displayed.
In our case customRenderFunction is the function used to render a template for each individual result.
The resultTemplate variable contains a Hogan.js template.
The template is populated via the customRenderFunction function before being rendered onto the page.
And as mentioned before, we'll now need to update our previously-initialized search settings with our new render function.
swiftypeSearch settings
$('#st-search-input').swiftypeSearch({
  // ...  code from the previous step
  renderFunction: customRenderFunction,
});
We should now see both search and autocomplete.
Step 3: Enable Sorting
As with any real e-commerce website, it is important to be able to sort the data.
Learn more about sorting with the Site Search API.
Looking through the information we have for each product, let's pick a few columns to sort by:
- Relevancy (default)
- Price
- Date Added
As you may have noticed, we already have links that switch between different sorting options on the right-hand side of the screen. To make links functional, let's add the following code to the top of your <script> section:
searchConfig object
var searchConfig = {
  sort: {
    field: undefined,
    direction: undefined
  },
};
The searchConfig object holds search query settings, which are limited to field and direction for sort at the moment (we'll add more later in the tutorial).
Let's continue to make our sort links functional by adding the following code below the searchConfig variable:
var reloadResults = function() {
  Swiftype.reloadResults();
};

var readSortField = function() {
  return { products: window.searchConfig.sort.field };
};

var readSortDirection = function() {
  return { products: window.searchConfig.sort.direction };
};

$('.sort').on('click', function(e){
  e.preventDefault();
  // Visually change the selected sorting order
  $('.sort').removeClass('active');
  $(this).addClass('active');
  // Update sorting settings
  window.searchConfig.sort.field = $(this).data('field');
  window.searchConfig.sort.direction = $(this).data('direction');

  reloadResults();
});
There is a lot going on, so let's review it step by step.
We...
Attached an event-handler to HTML links with the
sortclass, which fires when a user clicks a link to change the sorting order. This event updates oursearchConfigsort field.Created the
readSortFieldandreadSortDirectionfunctions to access the sort properties from thesearchConfigobject by accessingwindow.searchConfig.sort.fieldandwindow.searchConfig.sort.direction.Wrote a function called
reloadResults, which reloads and updates the results.
Now, let's update our existing swiftypeSearch settings to see this in action.
swiftypeSearch settings
$('#st-search-input').swiftypeSearch({
  // ...  code from the previous step
  sortField: readSortField,
  sortDirection: readSortDirection,
});
Go ahead and try to sort the results!
Step 4: Enable Filtering
Another important feature for a good e-commerce website is the ability to filter the inventory.
Learn more about filtering with the Site Search API.
In our example, there are many ways we can filter the data:
- by when it was added (today, last week, etc)
- by quantity remaining
- by price range.
In this tutorial we will filter our results by price ranges.
We will have 4 price categories to filter by:
- Under $5
- Under $10
- Under $25
- Over $50
To implement these filters, let's start by updating our searchConfig:
searchConfig object
var searchConfig = {
  // ... code from the previous step
  price: {
    from: undefined,
    to: undefined
  },
};
This expanded the searchConfig object with another key named price.
It is a hash with the keys from and to.
These keys are going to be used to keep track of the values that we are going to filter the price column by.
Let's again continue by adding some code to our <script> tag, under our searchConfig object:
var readFilters = function() {
  return {
    products: {
      price: {
        type: 'range',
        from: window.searchConfig.price.from,
        to: window.searchConfig.price.to
      }
    }
  }
}

$('.price-filter').on('click', function(e){
  if (this.checked) {
    // Visually update the checkboxes
    $('.price-filter').each(function() {
      this.checked = false;
    });
    this.checked = true;
    // Update the search parameters
    window.searchConfig.price.from = $(this).data('from');
    window.searchConfig.price.to = $(this).data('to');
  } else {
    window.searchConfig.price.from = undefined;
    window.searchConfig.price.to = undefined;
  }
  reloadResults();
})
We've added another event-handler for click events on links with the price-filter class.
In addition to updating some visuals, this function updates the price values inside searchConfig.
Calling readFilters returns a hash with filter settings and, in our case, specifies price range to filter by.
Now, let's update our existing swiftypeSearch settings with the filters option, which takes the readFilters function.
swiftypeSearch settings
$('#st-search-input').swiftypeSearch({
  // ...  code from the previous step
  filters: readFilters,
});
Filters should be fully functional now... Selecting the "Under $10" category will make the list shrink!
Step 5: Enable Faceted Search
Ahh, the last step...
In our case the behavior for faceted search is going to be as follows:
Typing a query (such as "product") will load up a list of results as well as facets. For example, in the
categoryfacet we would expect to see "books (3)" where "books" is thecategoryand "3" is number of available books.When we click on one of the facets, we would like to add that
categoryto our filters and, subsequently, for the search result set to shrink. For example, if we clicked "books (3)", we would expect to see only the 3 books in that category. Additionally, if we select one of thetagsfacets, we would expect to see the number of products shrink to fewer than before.Clicking "Clear All" will clear any selected facets and increase the number of products shown.
Let's start by updating searchConfig:
searchConfig object
var searchConfig = {
  // ... code from the previous step
  facets: {},
};
We just added another property key to searchConfig. The facets object stores facet settings.
Let's add faceted search, now:
var $facetContainer = $('.st-dynamic-facets');

var bindControls = function(data) {
  var resultInfo = data['info'],
  facets = '';

  $.each(resultInfo, function(documentType, typeInfo){
    $.each(typeInfo.facets, function(field, facetCounts) {
      facets += ['<div class="facet"><h3>', field, '</h3></div>'].join('')
      $.each(facetCounts, function(label, count) {
        var status = "",
        id = encodeURIComponent(label).toLowerCase();
        if (window.searchConfig.facets[field] && window.searchConfig.facets[field].indexOf(label) > -1) {
          status = ' checked="checked"';
        }

        facets += '<input type="checkbox"' + status + ' name="' + field + '" value="' + label + '" id="' + id + '"> <label for="' + id + '">' + label + ' (' + count + ')</label><br/>';
      });
      facets += '<a href="#" class="clear-selection" data-name="' + field + '">Clear all</a>'
    });
    $facetContainer.html(facets);
  });
};

$facetContainer.on('click', 'input', function(e) {
  window.searchConfig.facets = {}; // Set the hash to empty
  $('.st-dynamic-facets input[type="checkbox"]').each(function(idx, obj) {
    var $checkbox = $(obj),
    facet = $checkbox.attr('name');
    if(!window.searchConfig.facets[facet]) { // if facets are null or undefined, put empty array for the category
      window.searchConfig.facets[facet] = [];
    }
    if(obj.checked) { // add ids to array for the category
      window.searchConfig.facets[facet].push($checkbox.attr('value'));
    }
  });

  reloadResults();
});

$facetContainer.on('click', 'a.clear-selection', function(e) {
  e.preventDefault();
  var name = $(this).data('name');
  $('input[name=' + name + ']').attr('checked', false);
  window.searchConfig.facets[name] = [];

  reloadResults();
});

var readFilters = function() {
  return {
    products: {
      category: window.searchConfig.facets['category'],
      tags: window.searchConfig.facets['tags'],
      price: {
        type: 'range',
        from: window.searchConfig.price.from,
        to: window.searchConfig.price.to
      }
    }
  };
};
Understandably, with this much code to digest, we should take it step by step.
We selected the HTML element that will contain our facets and set it to a variable for easy future reference:
var $facetContainer = $('.st-dynamic-facets');
We also created a bindControl function, which is called after results are returned from Site Search, and and will be responsible for rendering the facets to the page:
var bindControls = function(data) {
  var resultInfo = data['info'],
  facets = '';
}
Two things are created in this step.
- The
resultInfovariable, which gets assigned theinfokey from the response. - The
facetsvariable that we will use to construct HTML tags to populate$facetContainer, which we defined earlier.
$.each(resultInfo, function(documentType, typeInfo){
  $.each(typeInfo.facets, function(field, facetCounts) {
    facets += ['<div class="facet"><h3>', field, '</h3></div>'].join('')
  });
});
We iterate through collections of data down to the facet information.
The field is either tags or category, and facetCounts contains information about each facet and its count.
We are going to take this data and add the header tag to the facets variable:
$.each(facetCounts, function(label, count) {
  var status = "",
  id = encodeURIComponent(label).toLowerCase();
  if (window.searchConfig.facets[field] && window.searchConfig.facets[field].indexOf(label) > -1) {
    status = ' checked="checked"';
  }

  facets += '<input type="checkbox"' + status + ' name="' + field + '" value="' + label + '" id="' + id + '"> <label for="' + id + '">' + label + ' (' + count + ')</label><br/>';
});
We iterate through facetCounts for a given column, constructing <input> and <label> elements for each facet.
Note that the status variable is going to be set to checked for the facets that are currently part of filter.
In other words, since facets are re-drawn on each query change, we need to keep track of what facets have been selected.
When we are done iterating through the collection of facets, we will add a "Clear All" link and set the HTML contents of $facetContainer to the content of the facets variable:
  facets += '<a href="#" class="clear-selection" data-name="' + field + '">Clear all</a>'
});
$facetContainer.html(facets);
We also include two event-handlers:
$facetContainer.on('click', 'input', function(e) {
  window.searchConfig.facets = {}; // Set the hash to empty
  $('.st-dynamic-facets input[type="checkbox"]').each(function(idx, obj) {
    var $checkbox = $(obj),
    facet = $checkbox.attr('name');
    if(!window.searchConfig.facets[facet]) { // if facets are null or undefined, put empty array for the category
      window.searchConfig.facets[facet] = [];
    }
    if($checkbox.attr('checked')) { // add ids to array for the category
      window.searchConfig.facets[facet].push($checkbox.attr('value'));
    }
  });

  reloadResults();
});
This one responsible for updating filter values inside searchConfig on each facet click.
$facetContainer.on('click', 'a.clear-selection', function(e) {
  e.preventDefault();
  var name = $(this).data('name');
  $('input[name=' + name + ']').each(function() {
    this.checked = false;
  });
  window.searchConfig.facets[name] = [];

  reloadResults();
});
This one is responsible for clearing out facet selection after clicking the "Clear All" link.
Lastly, we updated readFilters to include category and tags as filters:
var readFilters = function() {
  return {
    products: {
      category: window.searchConfig.facets['category'],
      tags: window.searchConfig.facets['tags'],
      price: {
        type: 'range',
        from: window.searchConfig.price.from,
        to: window.searchConfig.price.to
      }
    }
  };
};
Now, let's update our existing swiftypeSearch settings.
The facets option specifies DocumentType and columns to give you a count of results in that column.
Learn more about faceting with the Site Search API.
In our case, we are going to get facets for category and tag columns.
The postRenderFunction takes a function that is called after results are returned from Site Search. We've passed in bindControl (described above), which will be responsible for rendering the facets to the page.
swiftypeSearch settings
$('#st-search-input').swiftypeSearch({
  // ...  code from the previous step
  facets: { products: ['category', 'tags'] },
  postRenderFunction: bindControls,
});
Let's open your page and try to search for "product" again.
You should see a list of facets populated on the right-hand side of the page.
Clicking a facet should narrow down the search and update other facets.
Try it yourself!
If, for whatever reason, your code is not working right, feel free to refer to our working example.
Stuck? Looking for help? Contact support or check out the Site Search community forum!