How to add Site Search to your Zendesk Help Center
Zendesk.com is a customer service application that can include custom Help Centers.
This tutorial leverage the Zendesk design customization tools to use Site Search as the default Zendesk search box.
What You'll Need
- Knowledge of HTML/CSS.
- A Zendesk Team, Professional, or Enterprise plan.
Step 1: Create a Site Search Account
You can start with a free 14 day Site Search trial. This account will control the powerful features of your new search engine.
Step 2: Crawl your Website
Enter the URL of your Zendesk support portal into the site validation field. Once the validation process completes, you will be able to name your engine.
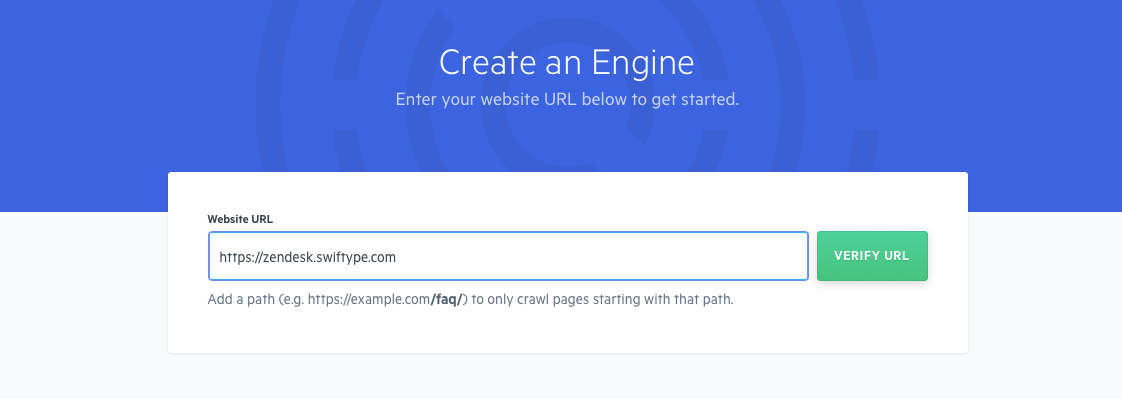
Site Search will crawl your site and create the search engine in real-time.
Step 3: Customize the Web Theme of your Zendesk Help Center
Switch over to your Zendesk Help Center and select Customize design from within the tools panel.
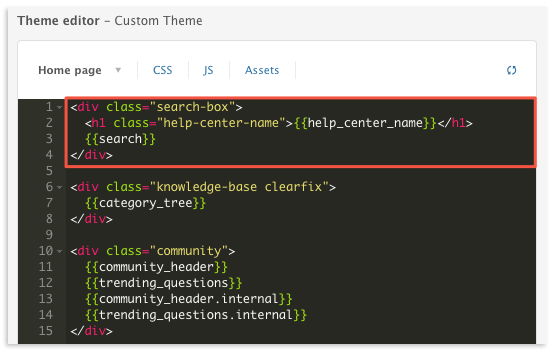
Click on the Edit Theme link in the sidebar. This will open up the Theme editor.
Here you are able to edit the HTML, CSS and JS by clicking on the top nav.
On this page you'll see a dropdown menu in the upper left corner of the editor will allow you to access all the templates for your Help Center content.
In this example we'll be adding Site Search search to our Help Center's Homepage.
If not viewing it already, select Home page from the content selector within the Theme editor.
Once there, get ready to identify and either:
- Comment it out completely.
- Replace the default search form with our Site Search embed snippet.
Identify the default Zendesk search function by locating the {{search}} tags.
Here you will find the default search snippets.
You can either remove these sections all together or comment them out by wrapping them with a <!-- --> container.
Commenting this section of code will enable you to more easily revert any changes just in case you need to.
An example of this modification to the Help Center theme can be found below:

Step 4: Copy the Installation Code
After preparing the custom theme template, your search engine should be ready for installation.
Head back to your Site Search dashboard and click the Installation button under Step 2.
Follow the Design and Customization Guide to make a design and retrieve your Site Search Install Code.
Step 5: Add the Embed Snippet to your Web Theme
Paste your Site Search Install Code into the prepared section(s) of your custom theme. It's best to do so within the same code blocks we modified in Step 3.
If your theme is also in need of a new search input field, we can provide that as well!
Save and publish your theme edits and you should see your Site Search search box in action!
Also...
If you paste the Install Code snippet into the Document head of your custom Zendesk theme, it will be included throughout your Help Center.
... But if you only want it to appear on select page templates, include the script with each unique instance.