Building a smart 404 page with Swiftype
It's true that Cool URIs don't change, but broken links are a fact of life on the web. It happens, and it frustrates visitors every day. Even if your own site never changes its URLs, another site might flub an inbound link. Incoming visitors will see a 404 Not Found page and probably won't stick around.
Using Swiftype, you can improve the standard 404 error page by making it smart -- it will find relevant results based on the URL and give the user a nice big search box to use for entering their own search. And since it uses Swiftype's hosted search, the smart 404 page requires no server-side coding, and can be installed anywhere.
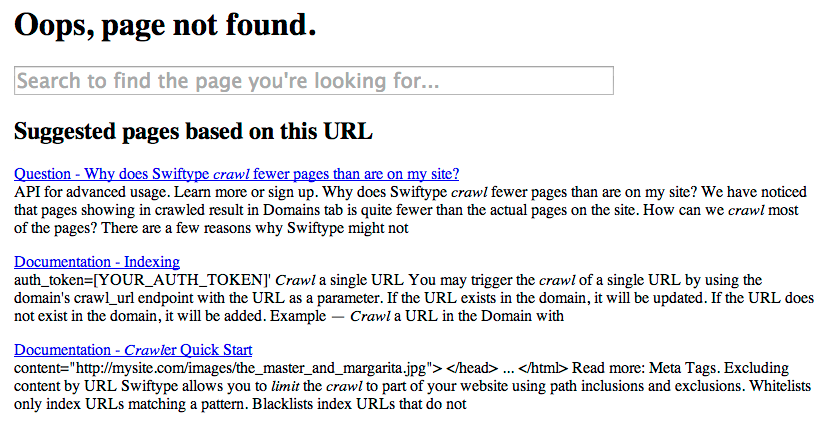
When you're done, the result will look something like this:
You can find a full working example that renders smart 404 pages based on the search engine for the Swiftype documentation on GitHub.
Create a Swiftype search engine
Before creating a smart 404 page, you need to create a Swiftype search engine to power it.
This example will use Swiftype's crawler based site search, but the essence of the code will be the same for search engines powered by our WordPress plugin or developer API.
If you haven't already, sign up for Swiftype and create a search engine to get started.
Adding Swiftype to your 404 page
First, add a search box powered by Swiftype. Use Swiftype's jQuery libraries to add a search form to the 404 page.
The code for installing Swiftype is the same as if you were putting the Swiftype jQuery libraries on a regular page in your site. You'll need to include the JavaScript and CSS files, add an input box for search, and add a div where the results will go.
<html>
  <head>
    <title>404 Not Found</title>
    <!-- Default styles for search and autocomplete -->
    <link type="text/css" rel="stylesheet" href="/search.css" media="all" />
    <link type="text/css" rel="stylesheet" href="/autocomplete.css" media="all" />
  </head>
  <body>
    <h1>Oops, page not found.</h1>
    <form>
      <input type="text"
             id="st-search-input"
             placeholder="Search to find the page you're looking for...">
    </form>

    <div id="st-results-container"></div>

    <p style="margin-top: 50px"><a href="/">Return to home page</a></p>

    <script type="text/javascript"
            src="http://ajax.googleapis.com/ajax/libs/jquery/1.9.1/jquery.min.js"></script>
    <!-- Swiftype JavaScript libraries -->
    <script type="text/javascript" src="/jquery.swiftype.search.js"></script>
    <script type="text/javascript" src="/jquery.swiftype.autocomplete.js"></script>

    <script type="text/javascript">
      // Configure full-text search
      $("#st-search-input").swiftypeSearch({
        resultContainingElement: "#st-results-container",
        engineKey: "5eMMdfkKCgz5wxyhR9RL"
      });

      // Configure autocomplete
      $("#st-search-input").swiftype({
        engineKey: "5eMMdfkKCgz5wxyhR9RL"
      });
    </script>
  </body>
</html>
Once the code is installed, your users can run a search when they land on a 404 page. Where the code for your 404 page goes will depend on your web server or CMS, but every one should have a way to customize this (see below for instructions for a few common platforms).
Running a search based on the URL
In many cases, the URL for a 404 page can help determine what kind of content the user is looking for. Instead of making the user search for a term, we can display results automatically when the user lands on the 404 page.
To get the query terms for the search, we'll use the pieces of the URL's path, split apart by "/", "_", and "-".
Then we need to execute a search using Swiftype's JSONP API and jQuery's getJSON method. Finally, we need to render the results into the st-results-container div.
// Return a string made up of text from the path components, splitting on "/", "-", and "_"
// For example, a path like "/foo/bar/123-the-best_thing_ever" will return
// "foo bar 123 the best thing ever"
function getKeywordsFromPath() {
  return window.location.pathname.split(/[-/_]/).join(" ")
}

// Loop over the search results and append each one to the st-results-container div.
// This example is suited for crawler and WordPress-based search engines.
// For API-based engines, the fields will depend on your search engine's schema.
function renderAutomaticResults(data) {
  var $resultContainer = $("#st-results-container");
  $resultContainer.html("");
  if (data['records']['page'].length > 0) {
    $resultContainer.append("<h2>Suggested pages based on this URL</h2>");
  }

  $.each(data['records']['page'], function(index, result) {
     var resultHTML = "<p><a href='" + result['url'] + "'>" +
       (result['highlight']['title'] || result['title']) + "</a><br>" +
       (result['highlight']['body'] || result['body'].substring(0, 300)) +
       "</p>";
     $resultContainer.append(resultHTML);
  });
}

// Perform a search using Swiftype's JSONP API and call renderAutomaticResults when it finishes.
// Replace the engine_key with your own; the one searches the Swiftype documentation.
var searchParams = {engine_key: "5eMMdfkKCgz5wxyhR9RL",
                    q: getKeywordsFromPath(),
                    per_page: 10}

$.getJSON("http://api.swiftype.com/api/v1/public/engines/search.json?callback=?",
          searchParams).success(renderAutomaticResults);
Installing the custom 404 page
Every web server or CMS should have a way to install a custom 404 page. Since there are so many, we can only cover a few. But if you search for "custom 404 page <your platform>" you should find instructions.
WordPress
Many WordPress themes have a 404.php file that will be rendered when a 404 error occurs. Read Creating an Error 404 Page in the WordPress Codex for details.
Ruby on Rails
Put your code in public/404.html.
Apache
Apache supports an ErrorDocument directive in its configuration file. Usually, you can put this in the .htaccess file in your web site's root directory.
ErrorDocument 404 /path/to/swiftype_smart_error.html
Read more in Apache's documentation.
See the smart 404 page in action
To see how a 404 page powered by Swiftype works, visit http://smart-404-example.herokuapp.com where the example application is installed. It uses the Swiftype documentation search engine as the content for the search results. You can browse the source code on GitHub and adapt it to your own purposes.