How to upgrade to the configurable search widget
Before August 2014, installing the Swiftype search embed required customizing the install code. The new configurable install code allows you to change your search settings through the Swiftype Dashboard without updating any code on your site. If you are using the old install code, you can upgrade to the new configurable install code by following these instructions. These instructions assume you have not modified the old install code. If you have, adjust the configuration in the Swiftype Dashboard to match the changes.
Overlay search style
The Overlay search style adds a search box to your web page and search results are displayed in the Swiftype search overlay.
The old install code looks similar to this:
<form>
  <input type="text" id="st-search-input" class="st-search-input" />
</form>
<script type="text/javascript">
var Swiftype = window.Swiftype || {};
  (function() {
    Swiftype.key = 'YOUR_ENGINE_KEY';

    /** DO NOT EDIT BELOW THIS LINE **/
    var script = document.createElement('script'); script.type = 'text/javascript'; script.async = true;
    script.src = "//s.swiftypecdn.com/embed.js";
    var entry = document.getElementsByTagName('script')[0];
    entry.parentNode.insertBefore(script, entry);
  }());
</script>
To transition this to the new configurable install code, first choose the Overlay style, then select "My website needs a search box", then update the search configuration.
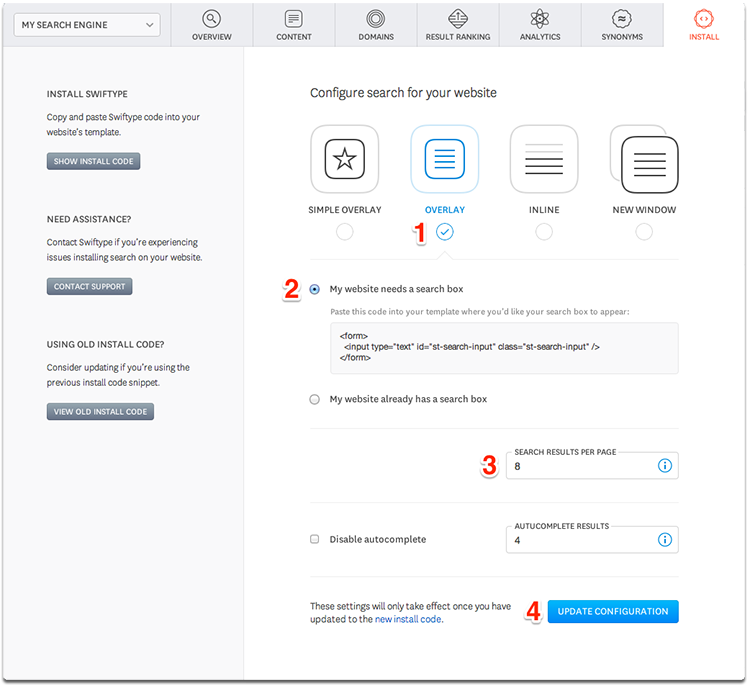
Next, remove the old install code from your template, and replace it with the new configurable install code. You should put this as high up on your page as you can, such as immediately after the <head> tag.
Finally, add the search box by copying the "My website needs a search box" code into your template where you would like the search box to appear.
<html>
  <head>
    <!-- Add the Swiftype search widget code as high as possible on the page -->
    <script type="text/javascript">
      (function(w,d,t,u,n,s,e){w['SwiftypeObject']=n;w[n]=w[n]||function(){
      (w[n].q=w[n].q||[]).push(arguments);};s=d.createElement(t);
      e=d.getElementsByTagName(t)[0];s.async=1;s.src=u;e.parentNode.insertBefore(s,e);
      })(window,document,'script','//s.swiftypecdn.com/install/v1/st.js','_st');

      _st('install','YOUR_INSTALL_KEY');
    </script>

    <!-- more page head markup -->
  </head>
  <body>
    <!-- your page content -->

    <!-- this is where your search box will appear -->
    <form>
      <input type="text" id="st-search-input" class="st-search-input" />
    </form>
  </body>
</html>
Same Page search style
The Same Page search style adds a search box to your web page and search results are displayed in a <div> container that you place on your page.
The install code looks like:
<form>
  <input type="text" id="st-search-input" class="st-search-input" />
</form>
<!-- Place this div where you would like the results to be displayed. -->
<div id="st-results-container"></div>
<script type="text/javascript">
var Swiftype = window.Swiftype || {};
  (function() {
    Swiftype.key = 'YOUR_ENGINE_KEY';
    Swiftype.renderStyle = 'inline';

    /** DO NOT EDIT BELOW THIS LINE **/
    var script = document.createElement('script'); script.type = 'text/javascript'; script.async = true;
    script.src = "//s.swiftypecdn.com/embed.js";
    var entry = document.getElementsByTagName('script')[0];
    entry.parentNode.insertBefore(script, entry);
  }());
</script>
To transition from the Same Page search style to the new configurable embed, first choose the Inline style. Then select the the "My website needs a search box" option and the "My website needs a search results container" option, and then update the search configuration.
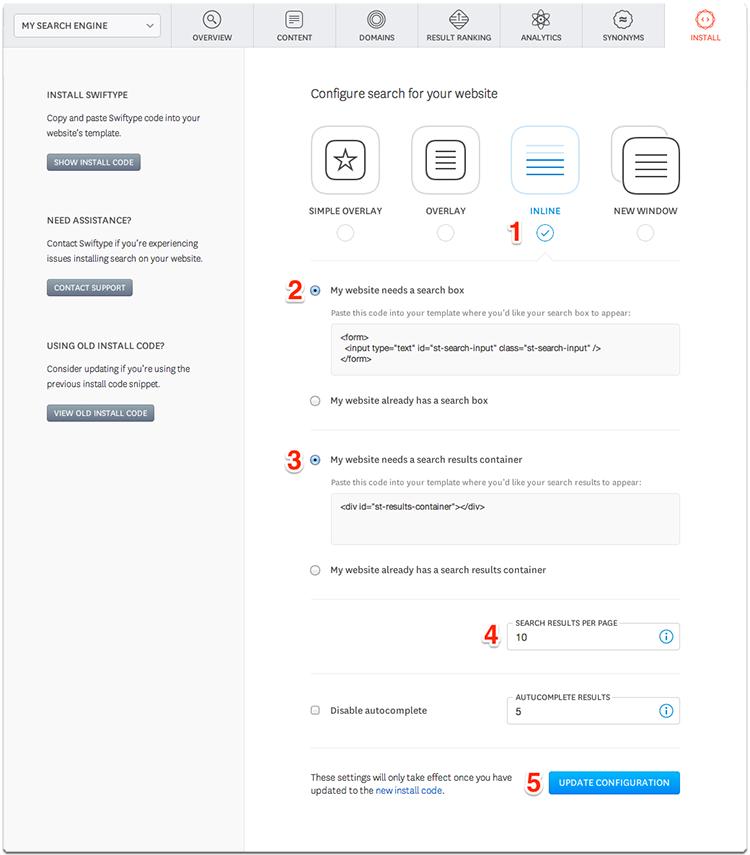
Next, remove the old install code from your template, and replace it with the new configurable install code. You should put this as high up on your page as you can, such as immediately after the <head> tag.
Next, add the search box by copying the "My website needs a search box" code into your template where you would like the search box to appear.
Finally, add the search results container by copying the "My website needs a search results container" code into your template where you would like the results to appear.
<html>
  <head>
    <!-- Add the Swiftype search widget code as high as possible on the page -->
    <script type="text/javascript">
      (function(w,d,t,u,n,s,e){w['SwiftypeObject']=n;w[n]=w[n]||function(){
      (w[n].q=w[n].q||[]).push(arguments);};s=d.createElement(t);
      e=d.getElementsByTagName(t)[0];s.async=1;s.src=u;e.parentNode.insertBefore(s,e);
      })(window,document,'script','//s.swiftypecdn.com/install/v1/st.js','_st');

      _st('install','YOUR_INSTALL_KEY');
    </script>

    <!-- more page head markup -->
  </head>
  <body>
    <!-- your page content -->

    <!-- this is where your search box will appear -->
    <form>
      <input type="text" id="st-search-input" class="st-search-input" />
    </form>

    <!-- this is where your search results will appear -->
    <div id="st-results-container"></div>
  </body>
</html>
New Page search style
The New Page search style adds a search box to your web page and requires you to specify a URL for the results page. On the results page, search results are displayed in a <div> container that you place on the page.
The New Page install code looks like this:
<form>
  <input type="text" id="st-search-input" class="st-search-input" />
</form>
<script type="text/javascript">
var Swiftype = window.Swiftype || {};
  (function() {
    Swiftype.key = 'YOUR_ENGINE_KEY';
    Swiftype.renderStyle = 'new_page';
    /** CONFIGURATION VARIABLE: YOU MUST EDIT BEFORE ADDING TO YOUR TEMPLATE. **/
    Swiftype.resultPageURL = '/results.html';

    /** DO NOT EDIT BELOW THIS LINE **/
    var script = document.createElement('script'); script.type = 'text/javascript'; script.async = true;
    script.src = "//s.swiftypecdn.com/embed.js";
    var entry = document.getElementsByTagName('script')[0];
    entry.parentNode.insertBefore(script, entry);
  }());
</script>
Additionally, on the results page, this code is placed where you want to results to appear:
<div id="st-results-container"></div>
To transition from the New Page search style to the new configurable embed, first choose the Result Page style. Then select the the "My website needs a search box" option and the "My website needs a search results container" option. Next, enter the URL of your search results page in the "Result Page URL" field (this should be the same as the value you set for Swiftype.resultPageURL when configuring the old install code). Update the search configuration to save your settings.
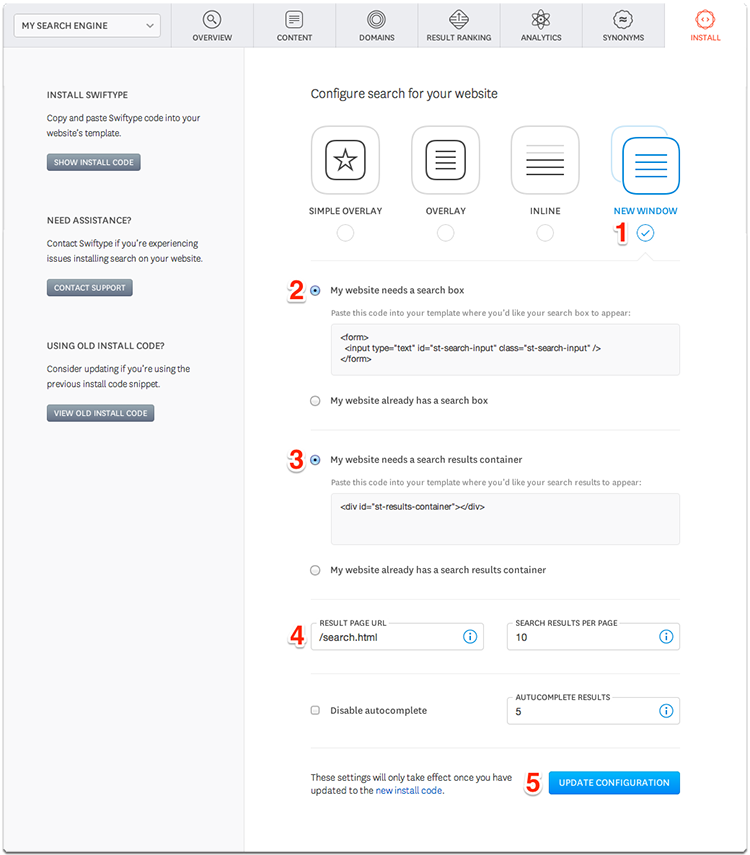
Next, remove the old install code from your template, and replace it with the new configurable install code. You should put this as high up on your page as you can, such as immediately after the <head> tag.
Next, add the search box by copying the "My website needs a search box" code into your template where you would like the search box to appear.
<html>
  <head>
    <script type="text/javascript">
      (function(w,d,t,u,n,s,e){w['SwiftypeObject']=n;w[n]=w[n]||function(){
      (w[n].q=w[n].q||[]).push(arguments);};s=d.createElement(t);
      e=d.getElementsByTagName(t)[0];s.async=1;s.src=u;e.parentNode.insertBefore(s,e);
      })(window,document,'script','//s.swiftypecdn.com/install/v1/st.js','_st');

      _st('install','YOUR_INSTALL_KEY');
    </script>

    <!-- more page head markup -->
    </head>
  <body>
    <!-- your page content -->

    <!-- this is where your search box will appear -->
    <form>
      <input type="text" id="st-search-input" class="st-search-input" />
    </form>
  </body>
</html>
Finally, on your search results page, add the search results container by copying the "My website needs a search results container" code into your template where you would like the results to appear.
<html>
  <head>
    <script type="text/javascript">
      (function(w,d,t,u,n,s,e){w['SwiftypeObject']=n;w[n]=w[n]||function(){
      (w[n].q=w[n].q||[]).push(arguments);};s=d.createElement(t);
      e=d.getElementsByTagName(t)[0];s.async=1;s.src=u;e.parentNode.insertBefore(s,e);
      })(window,document,'script','//s.swiftypecdn.com/install/v1/st.js','_st');

      _st('install','YOUR_INSTALL_KEY');
    </script>

    <!-- more page head markup -->
    </head>
  <body>
    <!-- your page content -->

    <!-- this is where your search box will appear -->
    <form>
      <input type="text" id="st-search-input" class="st-search-input" />
    </form>

    <!-- this is where your search results will appear -->
    <div id="st-results-container"></div>
  </body>
</html>