How to use Swiftype with Google Analytics
Google Analytics is a popular tool for tracking site-search analytics, and this tutorial will take you through the steps necessary to make sure searches through your Site Search powered search engine are tracked properly within your existing Google Analytics account.
Step 1: Make sure you're using the latest Google Analytics install code
Google Analytics has used a couple of different JavaScript-based install codes over the past few years.
You should make sure that you're using the latest "asynchronous loading" code, because it allows Swiftype to easily integrate with your analytics account. Also make sure that your Google Analytics install code is loaded before (above) your Swiftype install code on the page.
Beyond that, the asynchronous loading feature can improve the speed of your client-side page loads, so it generally provides an overall better experience for your users.
The latest version of the install code should look something like the following:
Universal Analytics
<script>

(function(i,s,o,g,r,a,m){i['GoogleAnalyticsObject']=r;i[r]=i[r]||function(){
(i[r].q=i[r].q||[]).push(arguments)},i[r].l=1*new Date();a=s.createElement(o),
m=s.getElementsByTagName(o)[0];a.async=1;a.src=g;m.parentNode.insertBefore(a,m)
})(window,document,'script','//www.google-analytics.com/analytics.js','ga');

ga('create', 'UA-XXXX-Y', 'auto');  // Replace with your property ID.
ga('send', 'pageview');
</script>
GA4
<script async src="https://www.googletagmanager.com/gtag/js?id=TAG_ID"></script>

<script>
  window.dataLayer = window.dataLayer || [];
  function gtag(){ dataLayer.push(arguments); }
  gtag('js', new Date());
  gtag('config', 'TAG_ID');
</script>
ga.js and gtag.js.
For more information on using the Google Analytics tracking code, see Google's documentation here.
Step 2: Configure Site Search tracking for your Google Analytics account
Follow this sequence of steps to configure site-search tracking in your Analytics account. You can find additional details in Google's help center here (click on Setting Up Site Search for a View).
- Login to Google Analytics.
- Switch to the correct dashboard.
- Click the gear icon located in the lower left corner to open up ADMIN.
- Under the third column, click View Settings.
- Enable Site Search Tracking.
- In the
Query Parameterfield:- If you use the Swiftype install code: enter
stq - If you use the Swiftype WordPress plugin: enter
s
- If you use the Swiftype install code: enter
- Click Done!
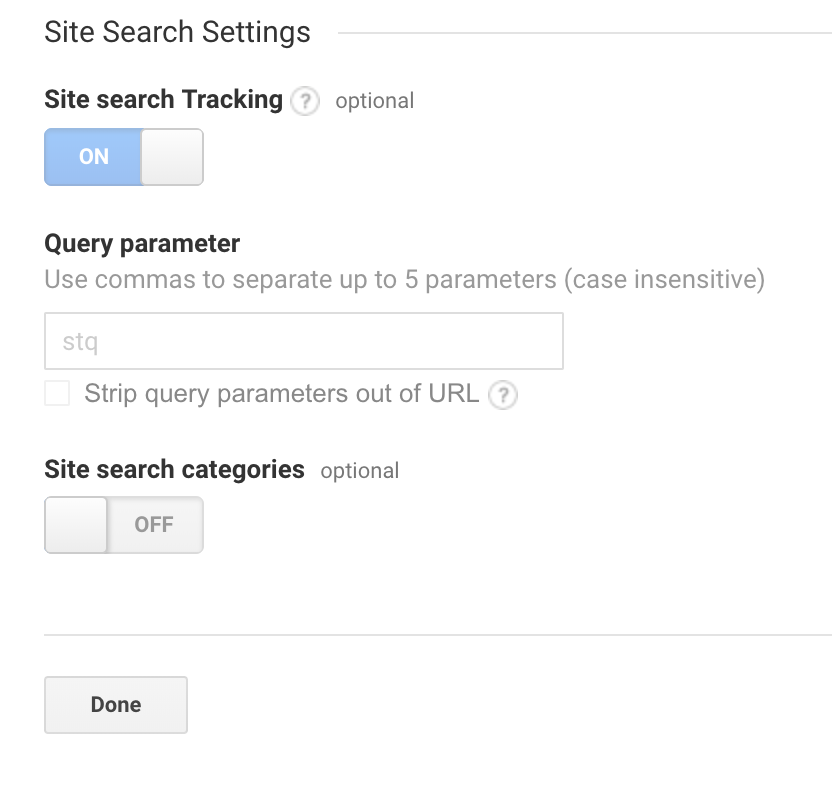
When you are finished, your profile settings screen should look like the following. Keep in mind that Google Analytics site-search tracking can take up to 48 hours to start appearing in your dashboard.
Using a Client Library?
If you are using a client library, you will need to pass a virtual pageview to Google Analytics. You can read the documentation from Google here.
This example JavaScript might be enough to get you started:
Universal Analytics
var url = window.location.href;
var re = new RegExp("\#stq=(.+)");
var m = url.match(re);


if (m != null) {
    var track = "/search?stq=" + m[1];
    ga('send', 'pageview', track);
} else {
    ga('send', 'pageview');
}
GA4
var url = window.location.href;
var re = new RegExp("\#stq=(.+)");
var m = url.match(re);


if (m != null) {
    var track = "/search?stq=" + m[1];
    gtag('send', 'pageview', track);
} else {
    gtag('send', 'pageview');
}
You may need to modify the regular expression within the re variable as well as the root path within the track variable. Do note that the above example is not compatible with Google Tag Manager.